Galileo iOS Quick Start Guide Document
Welcome to the Galileo iOS Quick Start Guide for developers. The following information should help you get started with building Galileo compatible applications on the iOS platform. The examples in this guide were built using Xcode 5.1 and have been tested with iOS SDK 7.0 and later. Comments, corrections and suggestions should be sent to dev@motrr.com.
First time developers should read through Apple’s introductory guide on iOS app development, Start Developing iOS Apps Today. Experienced developers may want to take a look at the sample projects for more advanced uses of the SDK.
Table of Contents
Resources
Installing the SDK
Configuring your XCode project
Connecting to Galileo
Moving Galileo
Resources
Documentation
The full index of class references can be viewed on the GalileoControl index page. In this guide you will make use of the following classes:
GCGalileo- Defines the gateway singleton object for connecting to Galileo and accessing motion controllers.GCGalileoDelegate- Delegate protocol for notification of connection and disconnection events.GCPositionControl- Control Galileo by moving to a specified position.GCVelocityControl- Control Galileo by setting angular velocity.
Community
For the latest updates check out our developer blog our developer portal. Feel free to email comments and questions to dev@motrr.com. If you would like to be notified of SDK updates then you can also send your requests to dev@motrr.com.
Sample projects
HelloWorldGalileo - Connect to Galileo and output simple pan and tilt commands when on-screen buttons are pressed.
UpdateGalileo - Check for new firmware updates and apply them over the air to Galileo.
RemoteControlGalileo - Two-way video calling and remote control over WiFi.
Installing the SDK
The SDK can be downloaded and added to your project manually. Git users can create a git submodule to stay up to date with future releases.
Manual installation
Installation is as easy as adding the SDK folder to you project directory.
- Download the SDK archive either in .zip format or .tar.gz.
- Extract the archive to somewhere appropriate in your project direcory. For this guide you will extract the contents of the archive to a folder called Galileo-iOS-SDK, located in the root of the project directory.
Installing as a git submodule
This method assumes you are using git for source control and have a git repository containing your Xcode project already set up.
Navigate to the root of you git repository and execute the following commands. This will create and initialise the submodule and commit the changes.
 git submodule add https://github.com/motrr/Galileo-iOS-SDK.git
 git commit -m "Added Galileo iOS SDK submodule"
At some point in the future you may wish to update you project’s copy of the SDK to the latest version. To do this, again navigate to the root directory and execture the following.
 cd Galileo-iOS-SDK
 git checkout master
 git pull
 cd ..
 git add Galileo-iOS-SDK
 git commit -m "Updated Galileo iOS SDK submodule"
Configuring your XCode project
Your Xcode project will need to be configured to include the GalileoControl framework and its dependencies. You will also need to declare the use of Galileo’s External Accessory protocols.
Adding the GalileoControl framework
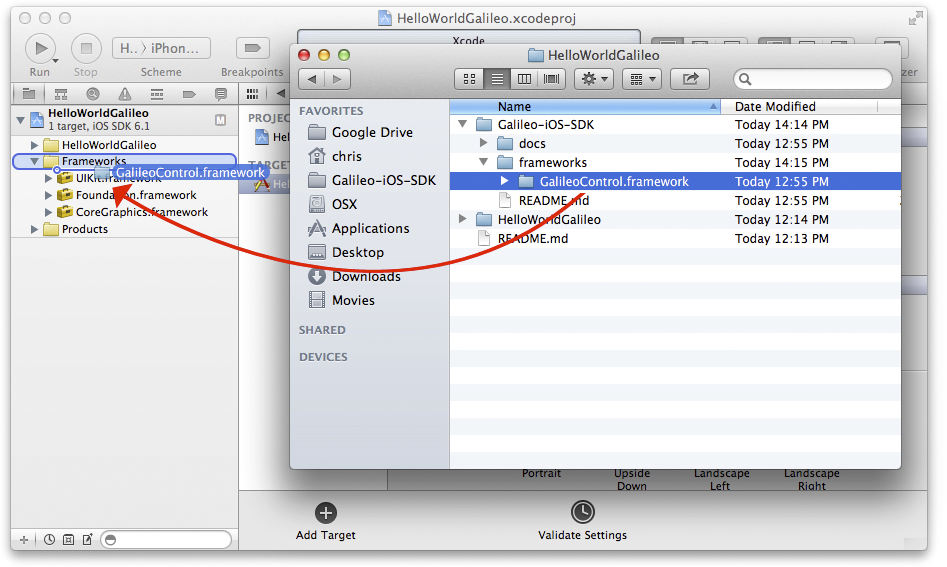
Locate the GalileoControl.framework directory within your SDK folder. Drag and drop the .framework directory into the Frameworks group of your Xcode project.
When asked to confirm, ensure that “Copy items into destination group’s folder” is not selected.
Adding additional dependencies
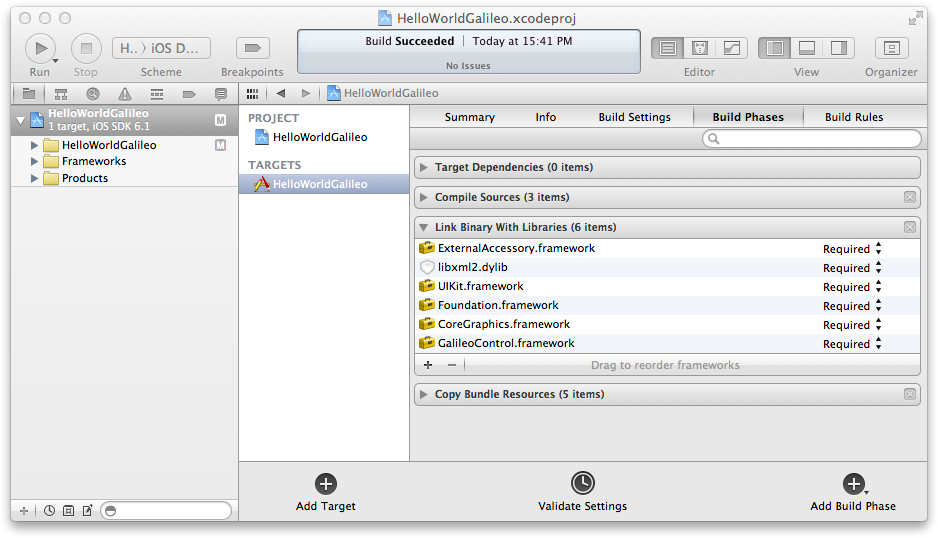
The GalileoControl framework also depends on the following Apple frameworks and libraries.
- libxml2.dylib
- ExternalAccessory.framework
- CoreBluetooth.framework
- QuartzCore.framework
Adding them to your project can be done using the following steps.
- In the project editor, select the target to which you want to add a library or framework.
- Click Build Phases at the top of the project editor.
- Open the Link Binary With Libraries section.
- Click the Add (+) button to add a library or framework.
- Select a library or framework from the list and click Add.
See the Apple documentation on Linking to a Library or Framework for more details.
Declaring External Accessory protocols
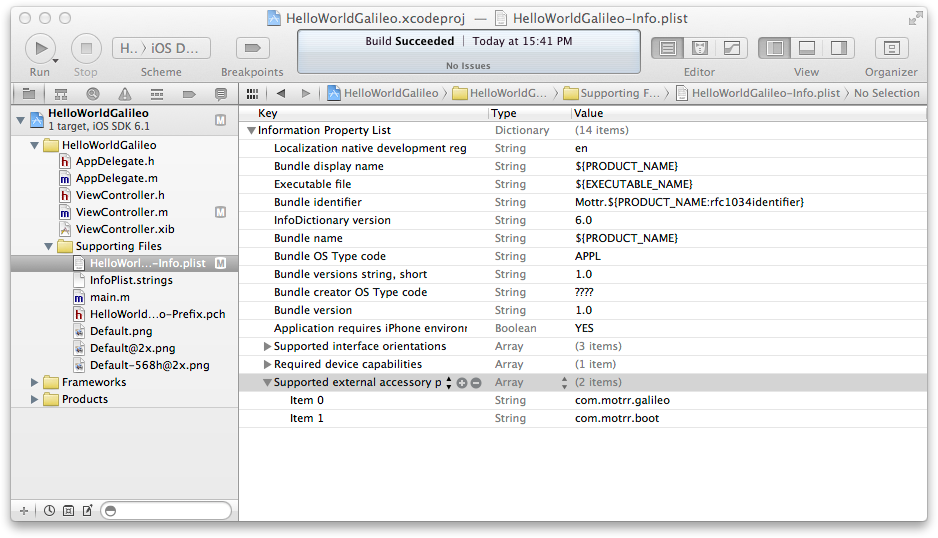
motrr defines one External Accessory protocols which must be declared in you project’s Info.plist file under the Supported external accessory protocols key.
com.motrr.galileo
Configure your Info.plist with the following steps.
- In the project explorer, locate you project’s Info.plist file. It will be prefixed with project’s name and is typically located in the Supporting Files group.
- In the property list editor, hold the pointer over an entry and click the Add (+) button.
- Choose the key name
Supported external accessory protocolsfrom the pop-up menu. - Add an entry for the motrr protocol
com.motrr.galileo.
Connecting to Galileo
Connecting to Galileo is performed asynchronously. Notification of a succesful connection is provided using the GCGalileoDelegate protocol whilst initiating a connection is done using the GCGalileo shared instance. A notification based alternative to the delegate protocol is also available, please refer to the documentation for details.
To begin with, ensure you include the
GalileoControl.hheader in any source files which make use of the GalileoControl framework.#import <GalileoControl/GalileoControl.h>To initiate a connection, access the shared Galileo instance and call the
waitForConnectionmethod. Typically you would also set the delegate prior to this call.[GCGalileo sharedGalileo].delegate = self; [[GCGalileo sharedGalileo] waitForConnection];In order to be notified when a connection is established you must also implement the
GCGalileoDelegateprotocol. The following code snippet alerts the user when Galileo connects by implementing thegalileoDidConnectmethod.- (void) galileoDidConnect { UIAlertView* galileoConnectedAlert = [[UIAlertView alloc] initWithTitle:@"Galileo connected!" message:nil delegate:nil cancelButtonTitle:@"OK" otherButtonTitles:nil]; [galileoConnectedAlert show]; }It is also normally a good idea to handle Galileo disconnecting in the event that the device is removed from the accessory or runs out of battery. A typical reaction might be to start waiting for the next connection, amongst other things.
  - (void) galileoDidDisconnect
 {
     [[GCGalileo sharedGalileo] waitForConnection];
 }
Moving Galileo
Galileo can be controlled with two distinct modes: position control and velocity control. Both can be accessed using methods on the GCGalileo shared instance.
An instance of
GCPositionControlis obtained by callingpositionControlForAxis:. A distinct position control instance exists for each axis the connected Galileo supports. The following delegate implementation would pan Galileo clockwise by 90 degrees as soon as a connection is established.- (void) galileoDidConnect { GCPositionControl* panPositionControl = [[GCGalileo sharedGalileo] positionControlForAxis:GCControlAxisPan]; [panPositionControl incrementTargetPosition:90.0 notifyDelegate:nil waitUntilStationary:NO]; }Velocity control is performed in a similar fasion, using an instance of
GCVelocityControl. The following example starts Galileo rotating the phone around it’s tilt axis at 100 degrees per second.GCVelocityControl* tiltVelocityControl = [[GCGalileo sharedGalileo] velocityControlForAxis:GCControlAxisTilt]; [tiltVelocityControl setTargetVelocity:100.0];The library will attempt to switch control modes automatically, however using more than one mode for a single axis requires explicitly instructing the
<Galileo>shared instance to switch modes using theselectMode:forAxis:method.GCControlAxis axis = GCControlAxisPan; // GCVelocityControl* tiltVelocityControl = [[GCGalileo sharedGalileo] velocityControlForAxis:axis]; [[GCGalileo sharedGalileo] selectMode:GCModeVelocityControl forAxis:axis]; [tiltVelocityControl setTargetVelocity:100.0]; // GCPositionControl* tiltPositionControl = [[GCGalileo sharedGalileo] positionControlForAxis:axis]; [[GCGalileo sharedGalileo] selectMode:GCModePositionControl forAxis:axis]; [tiltPositionControl incrementTargetPosition:-90 notifyDelegate:nil waitUntilStationary:NO];